So you want to learn how to make candles and you have come to the right place. There is a lot that goes into making a candle. Rather, there is a lot that goes into the planning for making candles. The actual making of them is pretty simple.
Table of Contents
Prefer to watch this project instead of reading it?
We will start by going over what goes into making a candle and the decisions that you have to make before you start. After you have decided on what type of candle, wick, wax, fragrance, etc. you will be ready to make you very own candles. From there, it is easy peasy.
Soy or Paraffin Wax: The Great Debate
Which is better, soy or paraffin wax? I believe there is no cut and dry answer to this. It truly is a personal preference and what you are looking for in a candle. I personally prefer soy wax.
So, let’s go over the pros and cons of each of them, so you can decide which one you want to use.
- Burn time- Soy wax has a longer burn time
- Production- Soy wax is naturally derived from soybeans and paraffin wax is a byproduct of petroleum.
- Scent throw- Paraffin wax has a stronger scent throw. The reason the hot scent throw is stronger is because the soy wax is more dense. Meaning it takes longer for the wax to heat up and release the fragrance.
- Frosting- This typically only occurs in soy wax candles
- Color- Typically paraffin wax will have a more vibrant color and soy wax has a more pastel color.
Can I burn my candle right away?
Back to the great debate on which wax type is better. It depends. With paraffin wax candles you can burn them right away. You just let them cool and then you can use them right away.
The same is not true with soy candles. They require a setting time of around 5 days. If you can wait longer, the scent throw tends to be stronger after a few weeks of setting.
When you are letting your candles cure, be sure to keep the lids on them to keep as much fragrance in there as possible. I love to use the 1/2 pint mason jars for candles. They are relatively inexpensive and come with a lid.
Scent Throw
I’ve already mentioned a few times about scent throw. Let’s dig a little deeper into what it is. A candle actually has two kinds of scent throw, hot and cold. Both of which are important when you are making candles.
The cold scent throw is the scent a candle gives off when it is at room temperature.
Whereas, hot scent throw is the scent the candle gives when it is burning.
Fragrance Oil Load
You might be thinking that you can just add some extra fragrance to increase that scent throw. The more the better, right? Well, not exactly. Each wax has what is called a fragrance oil load. It tells you the maximum fragrance oil that you can put into the candle.
Adding more fragrance oil than the load will actually cause you to get less of a scent throw. When you add too much fragrance, it can cause leaching, soot and burning issues.
The wax that I am using has a fragrance load of 6-8%.
Wick
It is super important to use the right wick when making candles. Think about a burning candle. What you want is a nice pool of wax on the top of the candle, so that the fragrance can evaporate into the air.
If you are using a wick that is too small, you will wind up with a small pool of wax in the center of your candle. What you are going for is a pool of wax that will go to the edge of the container.
Ok, so bigger is always better, right? No, not at all. Remember, the goal is to have the wax melt and for the fragrance to evaporate into the air. If the wick burns too hot, the fragrance can get burnt up before it has time to evaporate.
When getting your wick, make sure that you are choosing the right one for your project. The wick that I am using is a CD 10. The CD wicks are flat braided wicks that are basically self trimming. They are a cleaner burning wick. The ’10’ tells us that the wick is suitable for a medium sized container that is approximately 3 inch in diameter.
Colorant for Candle Making
This is the fun part, what color or colors do you want your candle to be? I am going to stat out by showing you how to make a one color candle, but if you would like to learn more techniques, let me know in the comments below.
So many choices. You can decide if you want to use liquid or block colorants.
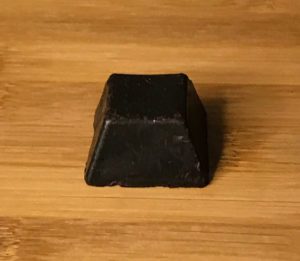
- Dye Blocks – Make darker more vibrant colors
- Liquid Dye- Create your own custom colors
Let’s talk about Fragrance
Yeah, get wild! Just make sure that the fragrance oil that you choose is suitable for candles. It is also important to check the use rate.
I am using an Brown Sugar and Fig fragrance oil that has a use rate of 6-8%. This is literally perfect because it is the exact as the fragrance load of my soy wax!
Heating the Wax
This part is easy enough. So you know that you have to have to wax fully melted in order for the fragrance to mix thoroughly. If you do not have the wax hot enough, the fragrance oil will not fully incorporate.
Be sure to pay attention to the particular wax that you are using. The wax I am using has a melting point of 121 °F – 125 °F. When heating the wax, I will add 10-15 degree to the melting point. I will heat the wax to about 134 °F.
Let’s Make Candles!
Ok, so we know all the pertinent information for planning to make candles. Now, the fun part. Let’s go through all the steps to actually make the candle.
Inserting the wick
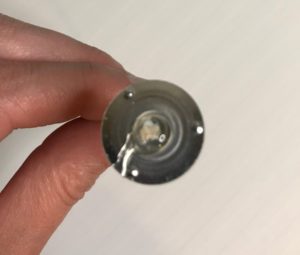
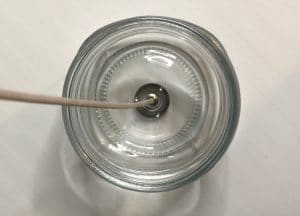
Whip out your hot glue gun and plug it in. You are going to put a small amount of glue on the center of the metal tab of your wick. You are then going to place the wick in the center of the candle jar.
How much wax should I use?
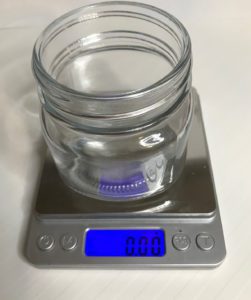
Ok, the easy way to figure out how much wax to use is to weigh your container. I normally will just put the empty container and the scale and tear it.
Then fill the container with water and weigh how much the water weighs. This is very close to what you are going to need for wax.
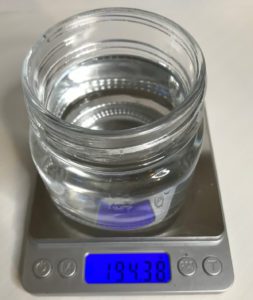
I have found that the water weight is very close to what you will need. To be safe, I normally keep a silicone mold or clamshell nearby. This way if I wind up with extra wax, I just pop it in there for wax melts.
Melt on Double Boiler
You are going to put the wax into a heat safe container or pouring pot. At the same time add your colorant to the container.
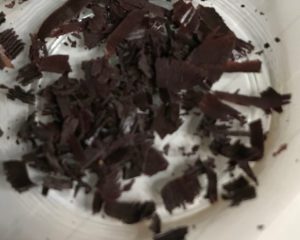
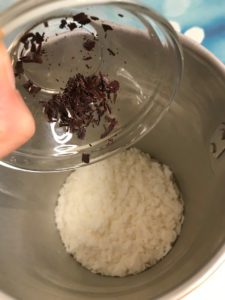
Please note that if you are using wax blocks that you will want to have small shavings and not large clumps of wax. This is to ensure that all of it has time to melt. If all of it does not get melted, you wind up with little specs on the bottom of your jar.
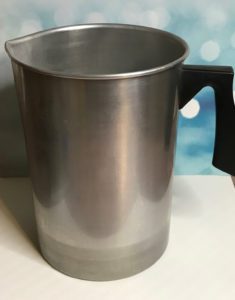
Removing From Heat
After the wax is 134 °F, remove from heat.
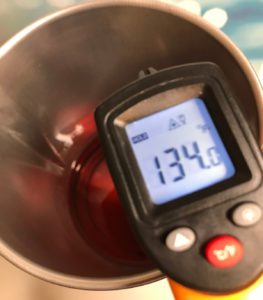
I normally stir it until it cools to roughly 120 °F before adding the fragrance. I will then add the fragrance and continue to stir.
If the wax is too hot when you add the fragrance, it can actually burn off the top notes from your fragrance.
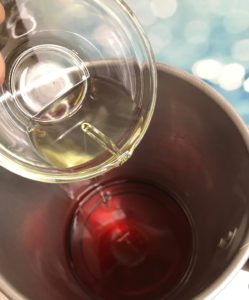
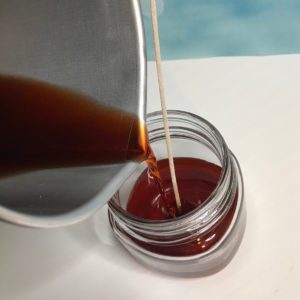
I will not pour my candles until the temperature of the wax drops to about 110 °F. Then you slowly pour into your container.
Keeping the wick straight
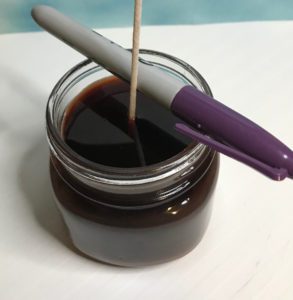
I believe there are specialty tools that you can buy to keep your wick standing straight up. I will just use a sharpie to hold the wick in place. I find that this works well for me.
I actually pour my candle where I am going to let it cool. Seriously, any movement can cause the top of the candle to have imperfections. (If you get imperfections, this can be fixed with a heat gun).
Memory Burn
Ok so when you light a candle, remember that the first burn is the most important. Trust on this one. You start by cutting your wick to 1/4 inch before lighting it.The rule of thumb is that for every inch in diameter your candle is, the first burn is one hour. This means that for a candle that is 3 inches wide, it must be burnt for 3 hours in the first burn.
How To Make Candles, So Easy You Can Start Today
Equipment
- Thermometer
- Candle Container
- Candle Lid
- Glue Gun and Glue Sticks
- Heat Safe Container or Pouring Pot
- Pan to Boil Water
- Spatula or Stirring Stick
- Scale
- Sharpie or marker
Ingredients
- 195 grams Soy Wax
- 15.6 grams Brown Sugar and Fig Fragrance Oil
- 1 tabbed CD 10 Wick
- 1 1/2 pint Mason Jar
- shavings Colorant Use as much or as little as you need for your desired color. Remember, that soy wax often needs more colorant and is more pastel.
Instructions
- Shave off desired amount of the color block. You do not want to cut off big chunks.
%27%20fill-opacity%3D%27.5%27%3E%3Cellipse%20fill%3D%22%23fff%22%20fill-opacity%3D%22.5%22%20rx%3D%221%22%20ry%3D%221%22%20transform%3D%22matrix(-34.98467%20-29.50513%20114.92396%20-136.26702%20278.1%20212.7)%22%2F%3E%3Cellipse%20fill%3D%22%23090909%22%20fill-opacity%3D%22.5%22%20rx%3D%221%22%20ry%3D%221%22%20transform%3D%22matrix(-56.03794%20-58.20105%2075.79242%20-72.97551%20121.6%2087.4)%22%2F%3E%3Cellipse%20fill%3D%22%23b9b9b9%22%20fill-opacity%3D%22.5%22%20rx%3D%221%22%20ry%3D%221%22%20transform%3D%22matrix(-45.1393%2017.4178%20-79.83207%20-206.88964%20286.2%2050.3)%22%2F%3E%3Cellipse%20fill%3D%22%23b9b9b9%22%20fill-opacity%3D%22.5%22%20rx%3D%221%22%20ry%3D%221%22%20transform%3D%22matrix(-4.03634%2037.15514%20-76.04127%20-8.26072%2042.7%20223)%22%2F%3E%3C%2Fg%3E%3C%2Fsvg%3E)
- Add wax and color shavings into your pouring pot.
%22%20transform%3D%22translate(.6%20.6)%20scale(1.17188)%22%20fill-opacity%3D%22.5%22%3E%3Cellipse%20fill%3D%22%23dfcf70%22%20cx%3D%2272%22%20cy%3D%22173%22%20rx%3D%2242%22%20ry%3D%2242%22%2F%3E%3Cellipse%20fill%3D%22%23f4f6ff%22%20rx%3D%221%22%20ry%3D%221%22%20transform%3D%22matrix(24.33575%2014.13979%20-17.21081%2029.62124%20179.5%20252)%22%2F%3E%3Cellipse%20fill%3D%22%233f4247%22%20rx%3D%221%22%20ry%3D%221%22%20transform%3D%22matrix(20.30399%20-47.37126%20122.7268%2052.60244%20145%20101.8)%22%2F%3E%3Cellipse%20fill%3D%22%23a1b3c6%22%20rx%3D%221%22%20ry%3D%221%22%20transform%3D%22matrix(3.09439%20-26.24112%20189.68572%2022.368%2067.2%200)%22%2F%3E%3C%2Fg%3E%3C%2Fsvg%3E)
- Place the pouring pot on a double boiler. Stir the wax while it melts. Remove from heat when it reaches 134 °F.
%22%20transform%3D%22translate(.6%20.6)%20scale(1.17188)%22%20fill-opacity%3D%22.5%22%3E%3Cellipse%20fill%3D%22%23fff%22%20rx%3D%221%22%20ry%3D%221%22%20transform%3D%22matrix(23.25364%2050.3255%20-180.64772%2083.47096%20106.6%20243.4)%22%2F%3E%3Cellipse%20fill%3D%22%23272828%22%20rx%3D%221%22%20ry%3D%221%22%20transform%3D%22matrix(179.1692%20-47.00416%2016.55724%2063.11244%2021.3%20111.4)%22%2F%3E%3Cellipse%20fill%3D%22%23a4a4a4%22%20cx%3D%22121%22%20cy%3D%22146%22%20rx%3D%2248%22%20ry%3D%2248%22%2F%3E%3Cellipse%20fill%3D%22%23202020%22%20rx%3D%221%22%20ry%3D%221%22%20transform%3D%22matrix(32.14174%2031.14751%20-49.56973%2051.152%2015.5%20114.2)%22%2F%3E%3C%2Fg%3E%3C%2Fsvg%3E)
- Continue to stir until the temperature drops to 120 °F.
- Add your fragrance oil to the melted wax.
%27%20fill-opacity%3D%27.5%27%3E%3Cellipse%20fill%3D%22%23f1ffff%22%20fill-opacity%3D%22.5%22%20rx%3D%221%22%20ry%3D%221%22%20transform%3D%22matrix(-246.80915%2015.0178%20-3.00735%20-49.42422%20156.7%2037.3)%22%2F%3E%3Cellipse%20fill%3D%22%23180000%22%20fill-opacity%3D%22.5%22%20rx%3D%221%22%20ry%3D%221%22%20transform%3D%22rotate(-40.8%20382.6%20-88.2)%20scale(144.10612%2074.4331)%22%2F%3E%3Cellipse%20fill%3D%22%23c3d1cc%22%20fill-opacity%3D%22.5%22%20rx%3D%221%22%20ry%3D%221%22%20transform%3D%22matrix(-28.34184%20-7.58877%2014.72409%20-54.99017%2026.2%20120.4)%22%2F%3E%3Cellipse%20fill%3D%22%23eceeed%22%20fill-opacity%3D%22.5%22%20rx%3D%221%22%20ry%3D%221%22%20transform%3D%22matrix(45.11086%2082.12786%20-40.65873%2022.33286%20205.8%2017.7)%22%2F%3E%3C%2Fg%3E%3C%2Fsvg%3E)
- Continue to stir until the temperature drops to 110 °F.
- Pour slowly into your candle container.
%27%20fill-opacity%3D%27.5%27%3E%3Cellipse%20fill-opacity%3D%22.5%22%20rx%3D%221%22%20ry%3D%221%22%20transform%3D%22matrix(59.01599%20105.96752%20-78.88197%2043.93136%2030.6%2095.6)%22%2F%3E%3Cpath%20fill%3D%22%23fff%22%20fill-opacity%3D%22.5%22%20d%3D%22M358.5%20292l-125%2019.7L191%2044.4l125-19.8z%22%2F%3E%3Cellipse%20fill%3D%22%235f404a%22%20fill-opacity%3D%22.5%22%20rx%3D%221%22%20ry%3D%221%22%20transform%3D%22matrix(82.45794%2015.0962%20-9.55924%2052.21415%20158%20187)%22%2F%3E%3Cellipse%20fill%3D%22%23dfdfdf%22%20fill-opacity%3D%22.5%22%20rx%3D%221%22%20ry%3D%221%22%20transform%3D%22matrix(-1.90162%2028.63033%20-290.48005%20-19.29366%20196.1%20286.5)%22%2F%3E%3C%2Fg%3E%3C%2Fsvg%3E)
- Use a marker to hold the candle wick in the center of the candle.
%27%20fill-opacity%3D%27.5%27%3E%3Cellipse%20fill-opacity%3D%22.5%22%20rx%3D%221%22%20ry%3D%221%22%20transform%3D%22matrix(-46.37906%20-65.5972%2076.9339%20-54.3944%20122.5%20157.7)%22%2F%3E%3Cellipse%20fill%3D%22%23fff%22%20fill-opacity%3D%22.5%22%20rx%3D%221%22%20ry%3D%221%22%20transform%3D%22rotate(-125.2%20207.3%2059.9)%20scale(78.75215%20253.40319)%22%2F%3E%3Cpath%20fill%3D%22%23fff%22%20fill-opacity%3D%22.5%22%20d%3D%22M362.7%2037.7L304%20135.2%20135.4%2033.8l58.5-97.5z%22%2F%3E%3Cellipse%20fill%3D%22%23f7f7f7%22%20fill-opacity%3D%22.5%22%20rx%3D%221%22%20ry%3D%221%22%20transform%3D%22matrix(133.27727%2056.87913%20-15.18107%2035.57177%2034.3%20287.2)%22%2F%3E%3C%2Fg%3E%3C%2Fsvg%3E)
- Leave until cooled completely.
- Trim wick to 1/4 inch.
- Put on lid and allow to set for at least 5 days, but preferably a few weeks.
