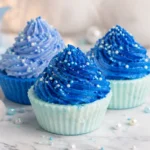
Cupcake Bath Bomb Recipe
A fizzy bath bomb base topped with a soft, foaming "frosting" swirl — made to look just like a cupcake, but made for the tub. Makes 4 bath bomb cupcakes.
Servings: 4 bath bombs
Cost: $5
Ingredients
Bath Bomb
- 279 grams Baking soda
- 135 grams Citric acid
- 18 grams Cocoa butter
- 9 grams Polysorbate 80
- 9 grams Smell the Rainbow Fragrance oil
- Lake dye
Frosting
- 183.6 grams Melt and pour soap base
- 81 grams Foaming bath butter
- 5.4 grams Smell the Rainbow Fragrance oil
Instructions
Cupcake Bath Bomb
- Melt the cocoa butter. Set up a double boiler and melt your 18g of cocoa butter completely, stirring it occasionally while it's on the heat so it melts evenly. Keep the heat low and gentle — you just need it liquid, not hot.
- Add the wet ingredients. Once it's melted, take it off the heat and stir in the polysorbate 80 and fragrance oil. Mix until it's fully combined. This little liquid mixture is what's going to bind your dry powders together and help disperse the oils evenly instead of leaving oil spots.
- Combine the dry ingredients. In a separate mixing container, whisk together your baking soda and citric acid until they're evenly blended with no clumps.
- Bring it together. Pour the melted cocoa butter mixture into the dry ingredients. Add your lake dye at this point, then mix thoroughly I like using gloved hands here to really work out any streaks of color and make sure everything's evenly coated.
- Add witch hazel to bind. Spray only as much as you need to get to a "wet sand" consistency.
- Pack the molds. Line a standard cupcake pan with silicone liners. Pack the mixture into each liner firmly — press it in harder than you think you need to, this matters more than people expect. You're dividing this batch across 4 bath bomb cupcakes, so figure roughly 112–113g per cavity.
- Let it set. Leave the pan undisturbed for 24 hours. I know it's tempting to peek, but resist — the setting time is what gives them their structure.
- Unmold. After 24 hours, gently press the bombs out of the liners and out of the pan.
Bath Bomb Frosting
- Whip the foaming bath butter. Using a hand mixer, whip your foaming bath butter until it's light and fluffy, similar to whipping buttercream. Set it aside.
- Melt the soap base. Cut your melt and pour soap into chunks and microwave in 15-second intervals, stirring between each one, until it's fully melted. Going low and slow here keeps it from scorching or getting rubbery.
- Add color. Once it's melted, stir your colorant directly into the liquid soap.
- Combine. Pour the melted, colored soap into the bowl with your whipped foaming bath butter, and add your fragrance oil.
- Mix. Using the hand mixer, beat everything together. Fair warning: it's going to look wrong. The mixture turns gooey and goopy and generally unappealing for a solid stretch of mixing — that's completely normal, so don't stop and don't panic.
- Keep going. As you keep mixing, the texture shifts from gooey to something pliable, creamy, and thick enough to hold its shape — similar to a stiff frosting or a thick whipped cream. That's your cue that it's ready to pipe.
Piping and Decorating
- Fit a piping bag with your favorite frosting tip — I used a Wilton 6B for that classic bakery-style swirl.
- Fill the bag with your finished "frosting."
- Pipe a dollop right in the center of each bath bomb cupcake first, then build outward and upward in a swirl, just like frosting a real cupcake.
- Finish with a sprinkle of biodegradable glitter over the top while the frosting's still soft enough for it to stick.
- Don't stress if your first swirl doesn't come out right — if you mess up while piping, just scrape the frosting back off, put it back in the piping bag, and try again. The texture's forgiving at this stage, so you can redo a swirl as many times as you need to get it looking right.