I was inspired while watching a tv show to make this ice cream scoop candle. Not that it looks like real food, it just popped in my head and I got up and started making it right then. I love the way the we are able to make candle wax look just like a scoop of ice cream! And, you would be surprised at how easy it is to make. However, just know that it does have quite a bit of cooling time, so you need to make this when you’re going to have time to come back to stir every 15-20 minutes.
I also love that the scoop is in the candle deep enough that it is not going to drip all over the counter when you use it.
Table of Contents
Prefer to watch this project instead of reading it?
Some of the links are affiliate links, because I am an associate and I earn a small commission on them.
Making The Ice Cream Scoop
Prepare Wax: Place a container on your scale and press the tare button. (This will make the scale show 0, while the container is on it). Weigh out 3.5 ounce Soy Wax and place it into your Pouring Pot.
Add Color: Using a knife cut a little but of the Lavender Color Block and add it to your candle wax. I am not going for a vibrant color, just a light purple so I just add a few shavings of color.
Melt: Melt the wax on a double boiler. Remove from heat.
Fragrance Oil: Add 0.14 ounce of Black Cherry Fragrance Oil to the melted soy wax. You are going to want to stir this for at least a minute to ensure the fragrance oil binds with the wax.
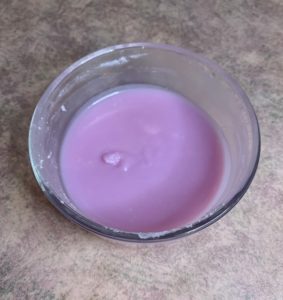
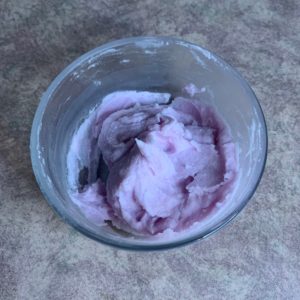
Cooling: I poured the wax into a different container as it was easier to mix and to use my ice cream scoop in it. Allow the wax to start to cool until there is a layer over the top of the wax.
Every 20 minutes or so, come back and stir the wax and check the consistency. You are going for a consistency that the wax is starting to get hard and you can tell that it will hold details in it.
Scooping: Grab a piece of wax paper and place it in your work area. Scoop the wax into your ice cream scoop. (You do have to have one of the Ice Cream Scoops that has a lever in order to get the ice cream scoop look). Using the side of your container, really press the wax into the scoop.
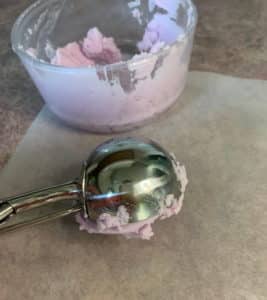
Release the ice cream scoop wax onto your wax paper.
One thing that I was worried about is if the scoop of wax didn’t turn out. Do not worry about this at all. If it does not look exactly how you would like, you can re-scoop it as many times as you need to.
Wick Hole: Using a Wick Pin, make a hole in the center of the ice cream scoop for your wick.
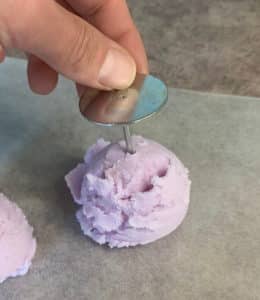
Cooling: Place the wax ice cream scoop into the freezer to harden it up a bit.
Making the Base of the Candle
Prepare Wax: Weight out 7.30 ounce of Soy Wax and put it into your pouring pot. Add a bit of Lavender Color Block to the wax.
If you do not know how much wax you will need for your container, you can get pretty close by filling the container 3/4 of the way, two times. I found that you normally wind up with just a touch more wax than you need with this method.
Melt: Melt the wax on a double boiler. Remove from heat.
Fragrance Oil: Add 0.29 ounce of Black Cherry Fragrance Oil to the melted soy wax. You are going to want to stir this for at least a minute to ensure the fragrance oil binds with the wax.
Place Wick: Be sure to clean your candle container out, especially if you used it to see how much wax you were going to need to fill it. Using a hot glue gun, add a small amount of glue to the bottom of the wick tab. Place the Candle Wick in the very center of the candle container and press down.
Pouring: Pour the candle wax into your container. You are only going to want to fill it about 3/4 of the way as we will need room to place the wax ice cream scoop on the top.
Cool: Allow the candle to cool completely.
Assembling The Ice Cream Scoop Candle
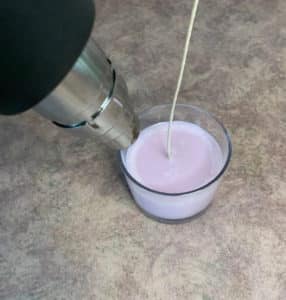
Heat The Wax: Using a heat gun or a blow dryer, you are going to heat the top of the candle a little bit. You just need the very top layer of wax to be melted, so that the ice cream scoop attaches to it.
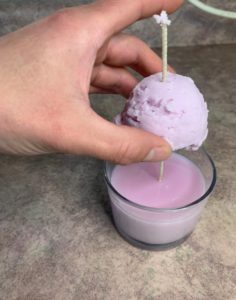
Place Ice Cream Scoop: Put the candle wick through the bottom of the ice cream scoop candle wax and press down firmly into the candle.
Trim Wick: Trim the candle wick to 1/4 inch.
Cure: For best results, allow the candle to cure for a week or two. This allows the fragrance oil to really bind with the wax, giving you a stronger
Black Cherry Ice Cream Scoop Candle
Equipment
- Scale
- Glue gun
- Candle Jar
- Ice Cream Scoop
- Wick Pin
- Candle Wick
- Pouring pot
Ingredients
Ice Cream Scoop
- 3.5 ounce Soy Wax
- 0.14 ounce Black Cherry Fragrance Oil
- Lavender Color Block
Candle Base
- 7.3 ounce Soy Wax
- 0.29 ounce Black Cherry Fragrance Oil
- Lavender Color Block
Instructions
Making The Ice Cream Scoop
- Prepare Wax: Place a container on your scale and press the tare button. (This will make the scale show 0, while the container is on it). Weigh out 3.5 ounce Soy Wax and place it into your Pouring Pot.
- Add Color: Using a knife cut a little but of the Lavender Color Block and add it to your candle wax. I am not going for a vibrant color, just a light purple so I just add a few shavings of color.
- Melt: Melt the wax on a double boiler. Remove from heat.
- Fragrance Oil: Add 0.14 ounce of Black Cherry Fragrance Oil to the melted soy wax. You are going to want to stir this for at least a minute to ensure the fragrance oil binds with the wax.
- Cooling: I poured the wax into a different container as it was easier to mix and to use my ice cream scoop in it. Allow the wax to start to cool until there is a layer over the top of the wax.
- Every 20 minutes or so, come back and stir the wax and check the consistency. You are going for a consistency that the wax is starting to get hard and you can tell that it will hold details in it.
- Scooping: Grab a piece of wax paper and place it in your work area. Scoop the wax into your ice cream scoop. (You do have to have one of the Ice Cream Scoops that has a lever in order to get the ice cream scoop look). Using the side of your container, really press the wax into the scoop.
- Release the ice cream scoop wax onto your wax paper. One thing that I was worried about is if the scoop of wax didn't turn out. Do not worry about this at all. If it does not look exactly how you would like, you can re-scoop it as many times as you need to.
- Wick Hole: Using a Wick Pin, make a hole in the center of the ice cream scoop for your wick.
- Cooling: Place the wax ice cream scoop into the freezer to harden it up a bit.
Making the Base of the Candle
- Prepare Wax: Weight out 7.30 ounce of Soy Wax and put it into your pouring pot. Add a bit of Lavender Color Block to the wax.
- If you do not know how much wax you will need for your container, you can get pretty close by filling the container 3/4 of the way, two times. I found that you normally wind up with just a touch more wax than you need with this method.
- Melt: Melt the wax on a double boiler. Remove from heat.
- Fragrance Oil: Add 0.29 ounce of Black Cherry Fragrance Oil to the melted soy wax. You are going to want to stir this for at least a minute to ensure the fragrance oil binds with the wax.
- Place Wick: Be sure to clean your candle container out, especially if you used it to see how much wax you were going to need to fill it. Using a hot glue gun, add a small amount of glue to the bottom of the wick tab. Place the Candle Wick in the very center of the candle container and press down.
- Pouring: Pour the candle wax into your container. You are only going to want to fill it about 3/4 of the way as we will need room to place the wax ice cream scoop on the top.
- Cool: Allow the candle to cool completely.
Assembling The Ice Cream Scoop Candle
- Heat The Wax: Using a heat gun or a blow dryer, you are going to heat the top of the candle a little bit. You just need the very top layer of wax to be melted, so that the ice cream scoop attaches to it.
- Place Ice Cream Scoop: Put the candle wick through the bottom of the ice cream scoop candle wax and press down firmly into the candle.
- Trim Wick: Trim the candle wick to 1/4 inch.
- Cure: For best results, allow the candle to cure for a week or two. This allows the fragrance oil to really bind with the wax, giving you a stronger

