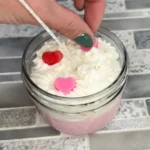
Whipped Candle with Heart Embeds Recipe
Whipped candles are one of the easiest ways to create a high-end, bakery-style candle at home—and this heart embed version is perfect for beginners.In this tutorial, you’ll learn how to make a whipped candle with heart embeds using a soft pink base, fluffy piped wax, and custom heart shapes that sit beautifully on top.This step-by-step guide covers everything from making embeds to whipping wax to the perfect consistency, so you can confidently create candles that look professional and gift-ready.Whether you’re making these for yourself, selling them, or just experimenting with new candle designs, this is a fun and beginner-friendly project with stunning results.
Servings: 4 candles
Cost: $5
Equipment
- Piping Tip
Ingredients
Heart Embeds
- 30 grams Tart Wax
- 2.4 grams Fragrance Oil
Candle Base
- 372 grams Soy Wax
- 29.8 grams Fragrance Oil
Whipped Wax Topping
- 300 grams Soy Wax
- 24 grams Fragrance Oil
Instructions
Step 1: Make the Heart Embeds
- Melt your tart wax, then add fragrance oil.
- Mix well and pour into your heart mold.
- This wax hardens quickly, so work while it’s still hot and fluid. You can always pop it back on the double boiler if it starts to solidify on you.
- Allow the embeds to fully cool, then remove from the mold and set aside.
Step 2: Prep Your Containers
- Clean your jars using rubbing alcohol and a paper towel to remove dust and residue.
- Attach your wick using hot glue, making sure it’s centered.
Step 3: Make the Candle Base
- Melt your soy wax using a double boiler, stirring as it melts.
- Once melted, remove from heat and allow it to cool.
- Add your pink dye and mix until evenly colored.
- When the temperature drops below 140°F (60°C), add your fragrance oil and mix thoroughly for at least 2 minutes.
- Pour into your jars, keeping the fill level even across all containers.
- Re-center your wick if needed.
- Step 4: Make the Whipped Wax Topping
- Melt your wax, then allow it to cool below 140°F before adding fragrance oil.
- Mix well and transfer to a mixing bowl.
- Let it sit and begin cooling.
- As it cools, wax will harden along the sides and bottom of the bowl—scrape this into the center.
- Using a hand mixer, begin whipping.You’ll notice stages:liquid (soupy)thickened (clumpy)mashed potato consistency
- Continue mixing until the wax:becomes thickholds its shapedoes not easily fall off a spatula
Step 5: Pipe and Decorate
- Transfer the whipped wax into a piping bag.
- Pipe onto your candle surface—I used small blobs for a soft, fluffy look.
- **Don’t pipe too high if you plan to use lids.
- As you pipe, place your heart embeds on top.
Step 6: Cool, Trim, and Cure
- Allow the candles to cool completely.Trim your wick and add labels if desired.Let your candles cure for 2–3 weeks before burning for the best performance.