
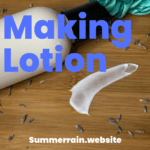
Learn how to make a homemade lotion like a professional, it will be a solid foundation that you can build on to make all kinds of products. All you have to do is combine the water, oil and emulsifier together to create your own lotion from scratch. From there, you can change the recipe with different oils and additives.
Prefer to watch this project instead of reading it?
Some of the links are affiliate links, because I am an associate and I earn a small commission on them. There is no additional cost to you, I earn a commission if you click through and make a purchase.
Why I love making lotion
You might ask yourself why would I want to make my own lotion? Well, I mean aside from the absolute level of satisfaction of making your own skin care, there are practical reasons too.
Simple to make – You do not need any fancy equipment to make your own lotion at home. The only thing that you might need that you don’t already have is an immersion blender, and those are relatively inexpensive.
Control over ingredients – You have complete control of what ingredients you want to put into your lotion. If you want something all natural or to avoid ingredients you are allergic to, you can customize the recipe.
Budget friendly – Once you start getting into making your own skin care, you will realize how many recipes use the same ingredients. And how inexpensive most of them are.
What is a lotion?
Lotions are designed to hydrate and moisturize our skin. They are an emulsion that includes water and oils. They can vary in thickness from a thin light weight lotion to a thicker lotion ( often called creams). Different lotions are going to include different actives and other ingredients that go above the moisturizing, such as soothing or brightening.

Lotion vs Body Butters
If you’re new to making skin care, I strongly recommend starting out with a Whipped Body Butter. Body butters are an excellent first step to making lotion. The only thing that I do not love about body butters is that they can be a bit greasy and they melt in too hot of temperatures.
Unlike a body butter, lotion contains water or it is aqueous. The water helps to pull the hydration into you skin.
Lotion Ingredients
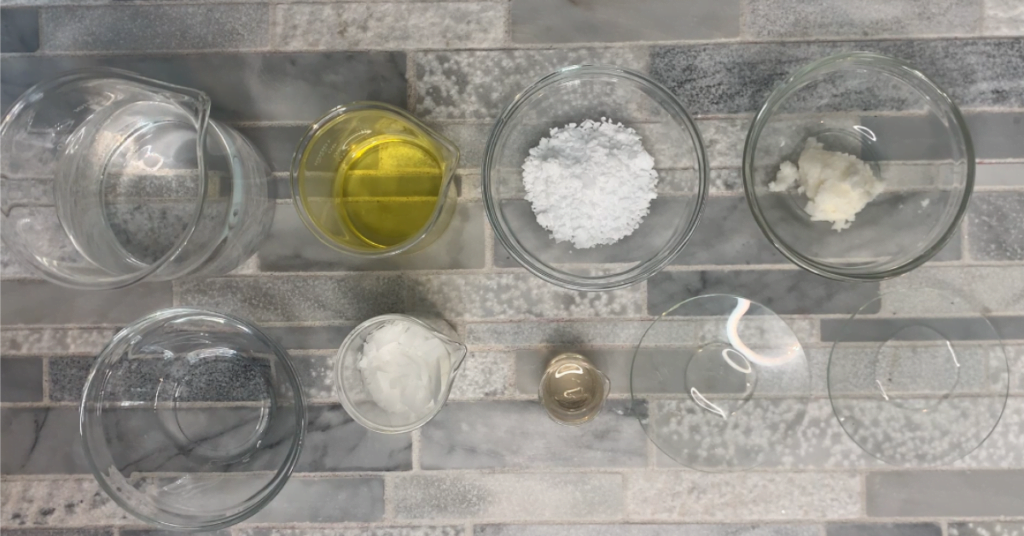
There are 5 main ingredients that go in a lotion:
- water
- oils
- emulsifier
- preservatives
- scent.
The general formula for making a lotion is:
70-80% Distilled water
8-25% Oils / Butters
3-6% Emulsifiers
2-5% Co-Emulsifiers
.5 – 1% Preservative
Lotion Phases
If you have baked anything before you might be familiar with phases in recipes. For example you will have a wet phase (oil, eggs, water, etc) and a dry phase (flour, salt, sugar, etc) ingredients. Making lotion is the same thing. We will have 2 heated phases: the water phase and the oil phase. Then we will have a cool down phase that includes all of our heat sensitive ingredients.
Water Phase
The heated water phase is going to be where our distilled water and any water soluble ingredients, that are not heat sensitive will go. To keep this simple, I am only going to add sodium lactate into the water phase. Sodium lactate is a humectant, it can hold about twice as much water as vegetable glycerin can.
Lotion is made with distilled water that makes the lotion feel lightweight and is able to absorb quickly into your skin. It has many functions in a lotion, you will notice that it is a large percentage of our formulation. This is because we want it to feel lighter than a body butter or a product that is made without water would feel.
We use distilled water because the metals, ions and potential bacteria have been removed from the water. Where in regular tap water, they are still there. Basically, distilled water is just pure water.
Along with water, you would add water soluble ingredients in with it. This is where you can add a hydrosol, aloe, panthenol or vegetable glycerin into your lotion.
Oil Phase
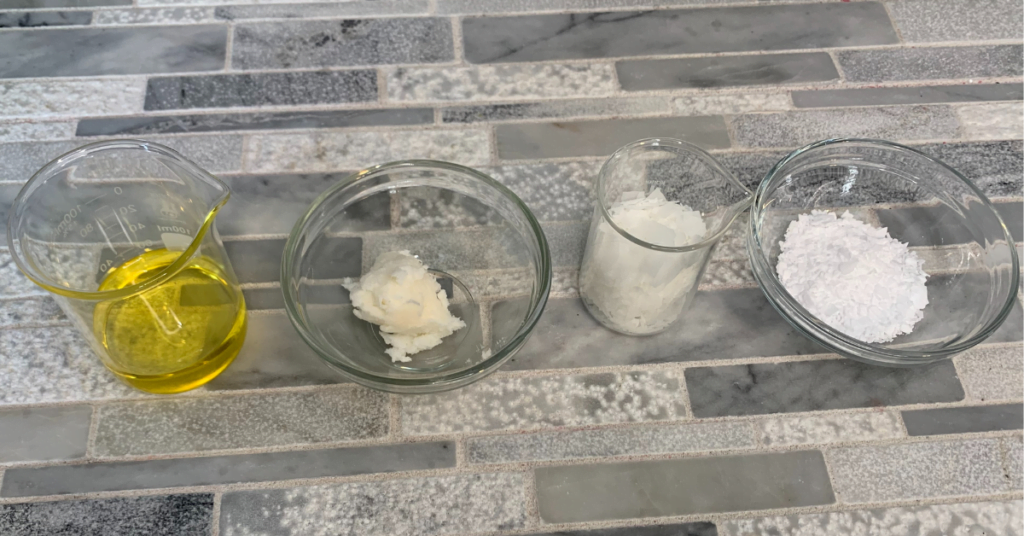
The oil phase is going to be where all of the oils and oil soluble ingredients go. In this formulation we will be using jojoba oil and shea butter. It can also include butters (like Cocoa Butter or Mango Butter), it also commonly has a co-emulsifier (like cetyl alcohol or stearic acid).
Oils and butters add skin loving ingredients into your lotions and creams. There are all kinds of different oils, each bringing it’s own set of benefits. This is where you can use some of your more expensive oils that you have been wanting to try out.
Carrier Oils
Carrier oils are the liquid oils that you add into your lotion. Some of the oils that you can use are:
Apricot oil – is loaded with fatty acids and vitamin E. It is suitable for all skin types, including dry skin.
Argon Oil – Jammed packed with essential fatty acids and Vitamin E. I love how intensely argon oil hydrates the skin.
Jojoba Oil – Jojoba oil closely resembles the sebum that your skin produces naturally.
Fractionated Coconut Oil – I have found that fractionated coconut oil gives the oil a lighter feel. It is also non greasy and it leaves your skin feeling silky (not greasy) once absorbed.
Butters
Butters are solid at room temperature and they are wonderful at thickening up a lotion. Some of my favorite butters are:
Cocoa Butter is high enough in fatty acids to thicken up our lotion. The melting point of cocoa butter is roughly right at skin temperature. It also has a delicious chocolatey aroma.
Kokum Butter is one of the hardest butters. It is derived from the kernels of the kokum tree. It also gives the lotion a non-greasy lightweight feeling.
Mango Butter is non-comedogenic, meaning that it is not pore clogging. What I like about mango butter is that it is light and silky, but at the same time it is packed with skin loving nutrients. It does not have much of a scent to it.
Shea Butter – This is a solid butter that comes from the nuts of the shea tree. It is an excellent moisturizer that is packed with vitamins and nutrients that our skin loves. Shea butter is suitable for all skin types.
Emulsifiers
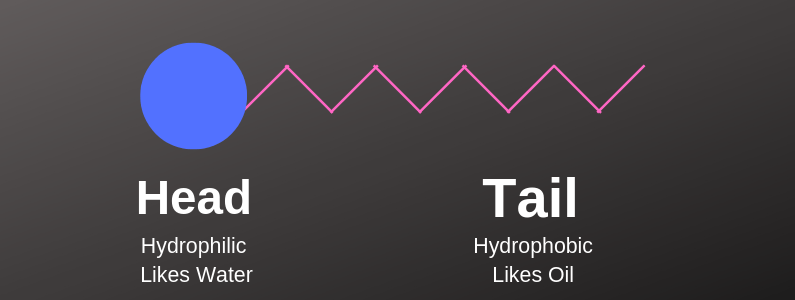
Oil and water do not mix together on their own, so we have to add in an emulsifier to get them to mix together. Emulsifiers have one end that loves oil and the other that loves water. It basically grabs a bit of oil and a bit of water on holds it together to create the emulsion. For more information on emulsions check out Emulsions – What Are They and How Do They Work? post.
Emulsifying Wax – This is a plant based emulsifier that is very common in lotions. It is recommended to use this when your oil phase is between 25-40% to get a good emulsion. If you are using less oil than that, a co-emulsifier is often needs to correct the texture. The use rate is typically 3-5%.
Olivum 1000 – The Olivum 1000 emulsifier comes from the olive tree plant. One difference with this emulsifier is that you can heat it in the water or the oil phase. It is typically used at a 3-5% in lotions.
BTMS 50 – White beads that have an unusual odor. Trust me, you will smell it right away, but the smell does not carry into the finished product.
Note on Waxes
A common misperception is that because some emulsifiers have the term “wax” in it, that waxes are emulsifiers. They are not. On their own, waxes such as Beeswax, Candelilla Wax will never be able to create an emulsion.
Waxes are sometimes used in a lotion, but they are used to thicken them up, not to emulsify them. They can also add a barrier to your skin that helps to protect it from the elements.

Co- Emulsifiers
In addition to emulsifiers often times you need a co-emulsifier.
Stearic Acid– This is a vegetable based product that helps to thicken the lotion up and keeps the emulsion stable.
Cetearyl Alcohol and Cetyl Alcohol – These both help to thicken and stabilize a lotion. I used Cetyl Alcohol in this lotion. Cetyl Alcohol is hard, white flakes, with no odor.
Cool Down Phase
This is where all of our heat sensitive ingredients will go. Now in the recipe you will notice that I give a temperature that you have to be below before you add these. If you do not have one, it is perfectly fine to wait until the lotion cools down to around room temperature to add them.
There are so many different things that can be added to this phase including extracts, fragrance oils or essential oils, actives and a preservative. The rule of thumb is to keep this phase at less than 10% of your formula so you do not compromise the stability of your lotion.
Preservatives
Adding waters to a lotion makes it lighter and absorbs more easily into your skin. However, it also becomes a breading ground for bacteria and mold. Preservatives help to prevent the mold and bacteria from growing. If you choose not to add one, treat the lotion like you would treat a general food recipe, you want to only use it for a few days and then toss it.
There are a lot of different preservatives that you can choose from, in this formula I am using Germall Plus .
Colors, fragrances and additives
Once you have the basics of making a lotion down, there are endless different lotions that you can make with your additives.
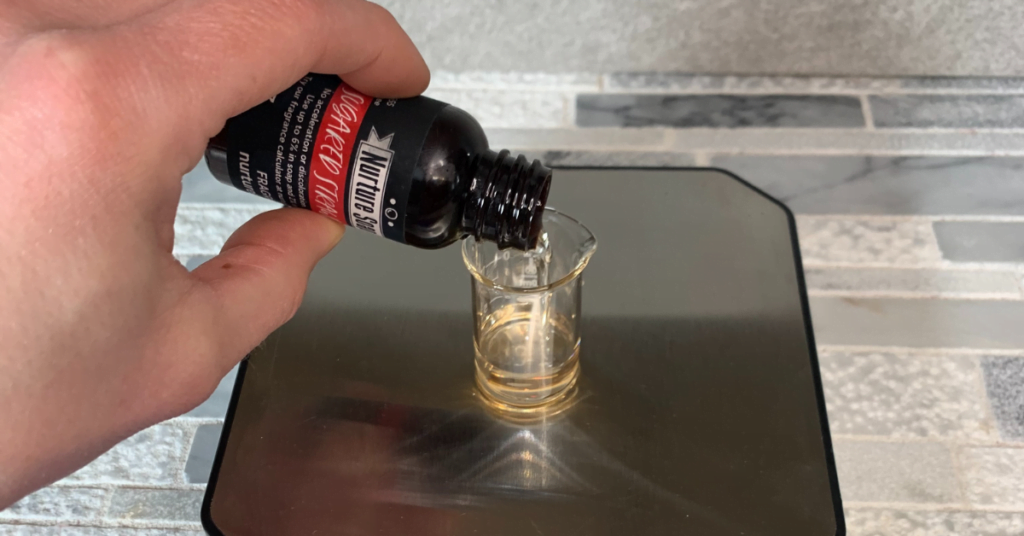
Changing out the scent is super easy, just check the use rate of that fragrance oil. You can also use an essential oil, but be sure to double check that it is safe for a leave on products. Some essential oils, like cinnamon cannot be used in leave on products.
I used Cucumber Melon Fragrance Oil it has top notes of cucumber and green leaves with a lovely middle note of honeydew melon. The bottom note is a light musk. I love this scent for a summer lotion.
When adding color you can use a mica powder. I like to wait until the lotion has cooled down before I add the mica powder, to prevent it from settling to the bottom of the container. You can also opt for a liquid colorant.
There are so many different additives that you can use in your lotion. I am only going to use Vitamin E Oil in this formula to keep it simple. Other additives that are often added are proteins, vitamin C, niacinamide (vitamin B3), etc.
Making a lotion
Once you have your ingredients picked out, making a lotion is easier than you would think. Let’s go ahead and go over the steps to making your own lotion right at home.
Hygiene
To make sure that your lotion is safe, you always want to work in a clean environment. It is not going to be sterile but it doesn’t have to be. You should always clean and disinfect all of the equipment that you will be using and your work area.
You should also clean out any containers that you will be using. New containers that are in wrapped packaging should be fine as is, but if you would like you can clean them. I like to spray a bit of rubbing alcohol in the containers or clean them out with a bleach solution before using them.
Weighing the ingredients
I am often asked for measurements in volume, such as a cup or a tablespoon. You do not want to use those forms of measurement when making your own skin care. You always want to be as precise as possible use weight as your unit of measuring. It is completely fine to use cups or measures of volume when you are cooking and it does not have to be exact, but when making skin care you do have to be precise.
When you are weighing out your ingredients, you do not have to weigh each one into a separate container like I do. I personally find this is the easiest way for me to keep all the ingredients straight. Otherwise I am likely to forget to add one or worse add one twice.
It is perfectly fine to weigh all of your oil phase into one container and all of you water phase into another. Just be sure to tare the scale in between each ingredient.
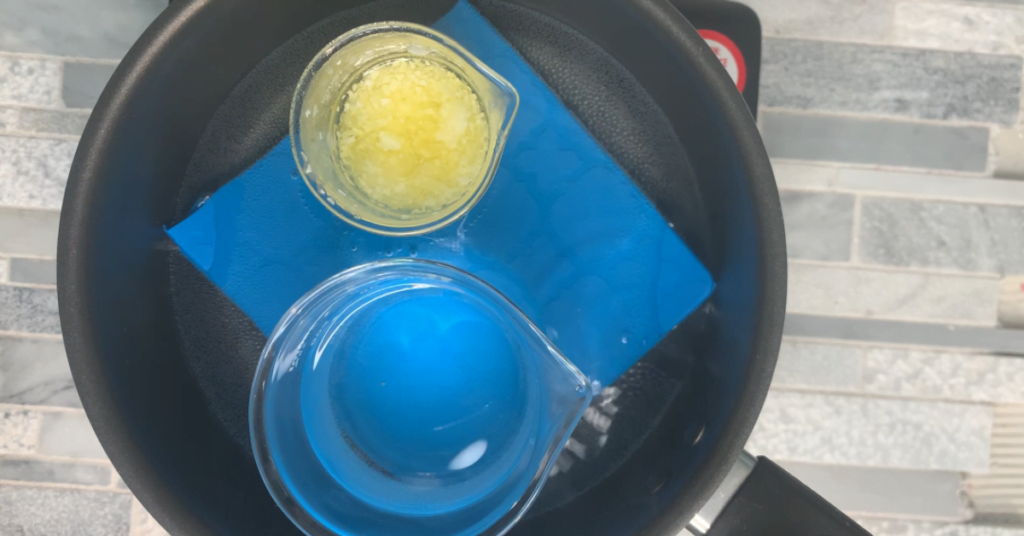
Heat both water and oil phase
It is very important that you heat both the oil phase and the water phase at the same time. You are going to need both of these phases to be roughly the same temperature in order to combine them. When I first started making lotion, I forgot to heat the water phase and when I poured the oil phase into it, it clumped up right away. I had to toss the whole batch, which was a total bummer.
Some advocate for the heat and hold method, personally I have never used that method and have not had any issues. However, if you feel more comfortable doing that, absolutely you should do that. Just be sure to cover your water phase with tin foil to reduce the water from evaporating out of the container.
You are going to heat both phases on a low to medium heat until the oil phase has completely melted.
Combine the phases
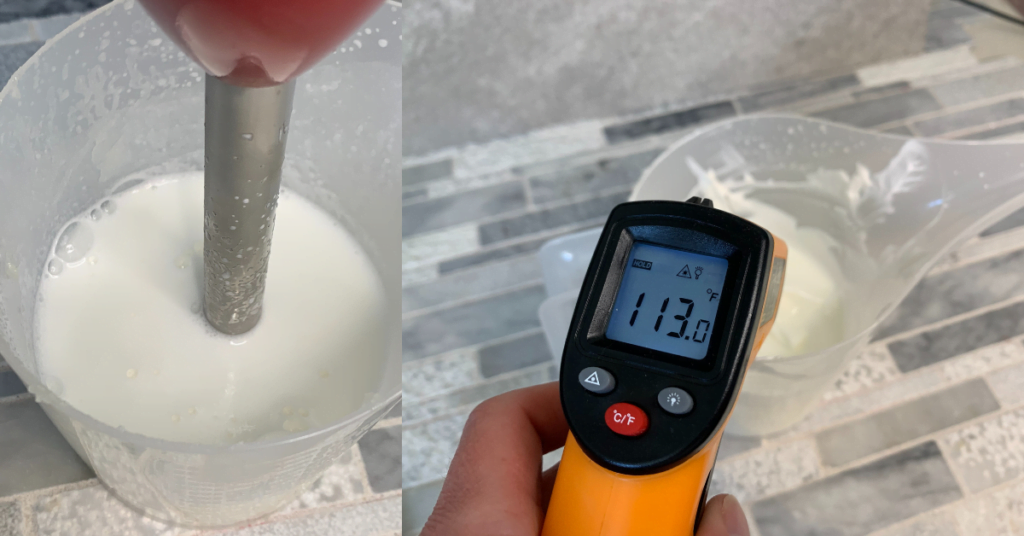
Once you have removed both the water and the oil phases from the double boiler, you will combine them together. Now I like to add the oil phase to the water phase, but I do not have a reason for this. If you prefer you can add the water phase into the oil phase.
You are going to want to mix it with an immersion blender right away to create an emulsion. A hand mixer will not work because you need the high sheer to make an emulsion. The high sheer can help with dispersing smaller droplets of oil within the water, creating a more stable emulsion.
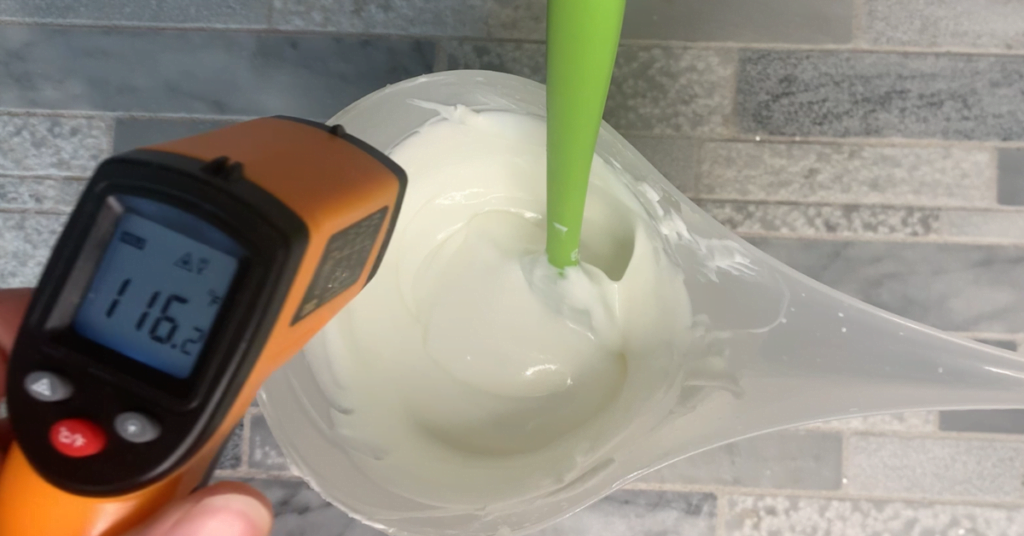
Cool down phase
Once the lotion has cooled down to below the temperature suggested on your preservative, you can add your heat sensitive ingredients. For Germall Plus, it has to be below 122ºF. This is the phase when you are going to add your fragrance oil or essential oils. You can also add any actives that you may be using.
Gently mix the cool down ingredients into your lotion until they are evenly mixed in.
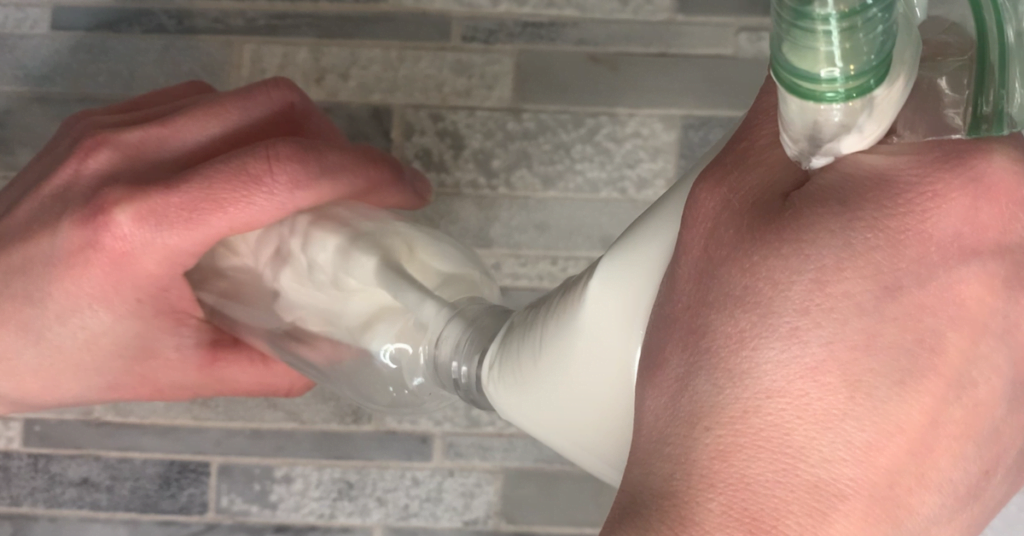
Packaging
I like to use the bottles with the flip tops or the pump tops for my lotion. I prefer them because it does not require you to dip your fingers into the lotion. Each time you dip your fingers in it, you are risking contaminating it with bacteria, water or other microbes.
Wait until the lotion is cooled down to room temperature before you place the top on the bottle. You want to wait because if you add the lid on before it is cool, it might get condensation on it and contaminate the lotion. Even one small drop of water floating on the top of the lotion can grow mold.
How to Make Lotion like a Professional – All ingredients explained
Equipment
- Scale
Ingredients
Water Phase
- 6.48 ounce | 72% Distilled Water
- 0.18 ounce | 2% Sodium Lactate
Oil Phase
- 0.45 ounce | 5% Shea butter
- 0.90 ounce | 10% Jojoba Oil
- 0.45 ounce | 5% Olivum 1000
- 0.27 ounce | 3% Cetyl Alcohol
Cool Down Phase
- 0.05 ounce | 0.5% Germall Plus
- 0.05 ounce | 0.5% Vitamin E Oil
- 0.18 ounce | 2% Cucumber Melon Fragrance Oil
Instructions
Hygiene
- To make sure that your lotion is safe, you always want to work in a clean environment. It is not going to be sterile but it doesn't have to be. You should always clean and disinfect all of the equipment that you will be using and your work area. You should also clean out any containers that you will be using. New containers that are in wrapped packaging should be fine as is, but if you would like you can clean them. I like to spray a bit of rubbing alcohol in the containers or clean them out with a bleach solution before using them.
Weighing the ingredients
- Weight out all of your ingredients, putting the water phase into one heat safe container and the oil phase in a separate heat safe container.
Heat both water and oil phase
- Heat the water and oil phase on a double boiler. You are going to heat them until the oil phase is completely melted.
Combine the phases
- Once you have removed both the water and the oil phases from the double boiler, you will combine them together. Now I like to add the oil phase to the water phase, but I do not have a reason for this. If you prefer you can add the water phase into the oil phase.
- Mix it with an immersion blender right away to create an emulsion.
Cool down phase
- Once the lotion has cooled down to below the temperature suggested on your preservative, you can add your heat sensitive ingredients. For Germall Plus, it has to be below 122ºF. This is the phase when you are going to add your fragrance oil or essential oils. You can also add any actives that you may be using. Mix well.


