Want to learn how to make a silicone mold using real gummy bears? If so, you have come to the right place! Silicone molds are amazing for crafting because you can use them for soap, wax melts, resin, bath bombs, and more. And the best part? You can make your own custom molds at home without expensive equipment. I personally started making them because buying a bunch of molds can get very expansive. I wanted to find a more cost effective solution and making them is easier than I thought.
In this guide, I’ll walk you through every step — from building your mold container to pouring the silicone and using the finished mold to make adorable melt and pour soap gummies. Whether you’re brand-new to mold making or you’ve tried it before and struggled, this tutorial covers everything you need to know.
Prefer to watch this project instead of reading it?
Some links on this website are affiliate links, meaning I may earn a small commission if you click and make a purchase. This comes at no additional cost to you.
Why Make Your Own Silicone Mold?
Before we get into the steps, here’s why making your own mold is worth it:
- You can create custom designs you can’t buy anywhere.
- It’s cheaper than buying pre-made specialty molds.
- You control the size, shape, and layout.
- Your mold can be reused over and over.
- It works for soap, wax melts, resin, cold process embeds, and more.
And gummy bears make the cutest little soaps and wax melts. Let’s jump in.
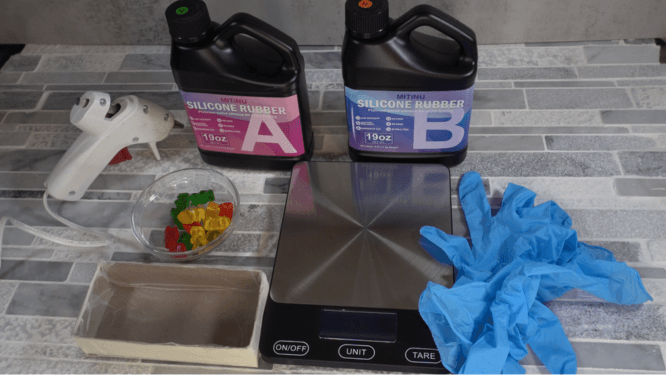
Materials You’ll Need
Here’s everything you need for this project. Having everything ready makes the process smoother and less stressful.
For the mold:
- Cardboard for building your mold box
- Tape
- Press’n Seal Saran Wrap (very important — this brand works best)
- 2-part silicone (equal-part mixing)
- Digital scale
- Mixing cup and stir stick
- Hot glue gun
- Rubbing alcohol
- Paper towels
- Gummy bears
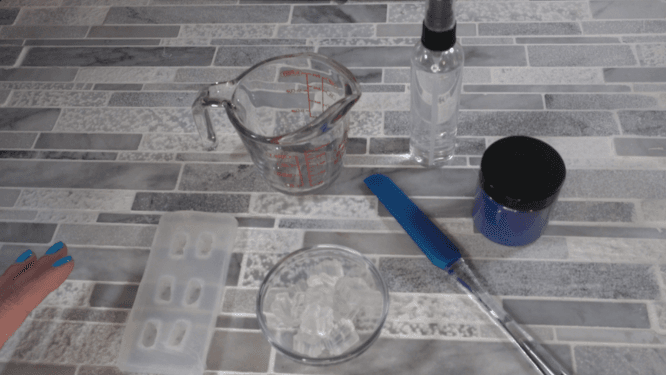
For making melt & pour soap gummies:
- Melt and pour soap base
- Mica powder
- Heat-safe container
- Rubbing alcohol in a spray bottle
- Microwave
- Silicone mold you created
- Fragrance oil (optional)
Step 1: Build Your Mold Container
Every good mold starts with a good container. You don’t need anything fancy — cardboard works great.
- Build a small cardboard box slightly larger than the layout you want for your mold.
- Tape all seams and corners thoroughly so no silicone leaks out.
- Completely line the inside of the box with Press’n Seal. This is going to make sure the silicone does not leak out or get absorbed into our cardboard.
- Smooth the wrap tightly against the inside walls so there are no wrinkles or air bubbles.
Tip: Press’n Seal matters because regular plastic wrap doesn’t grip the cardboard.
This container is your foundation, so take your time here. To get the sizing, I laid out the gummy bears how I wanted them in the mold and made it just a little bit larger than that.
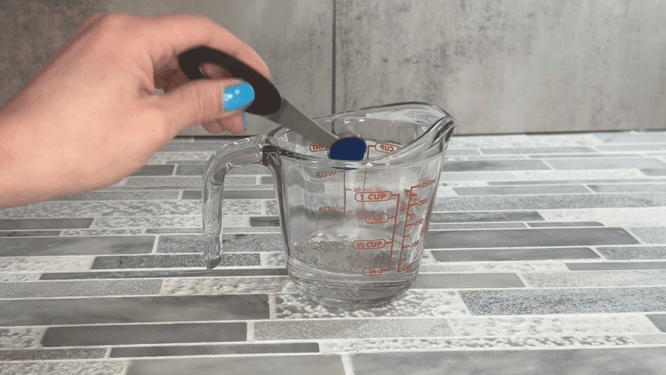
Step 2: Measure and Mix the Silicone
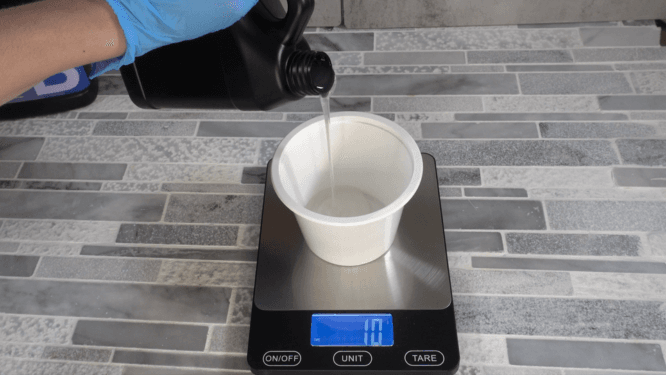
Most silicone mold kits use two components: Part A and Part B.
- Weigh out equal parts of A and B on a digital scale.
- Pour both parts into a clean mixing cup.
- Stir slowly but thoroughly for about 2 minutes. Scrape the sides and bottom as you go.
- Mix until you can no longer see any streaks or swirls.
Common mistake: Under-mixing. This creates soft spots or areas that never cure. When in doubt, mix an extra 30 seconds.
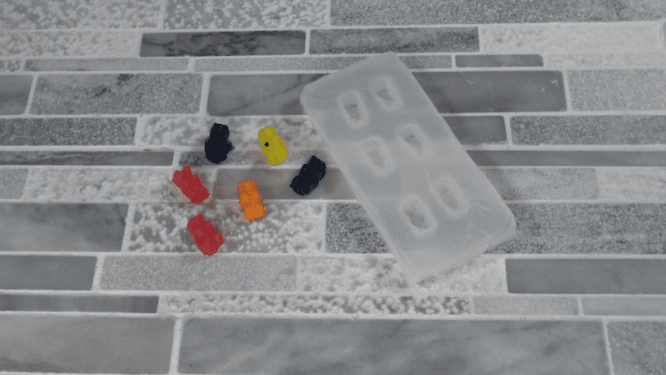
Step 3: Prepare the Gummy Bears
Gummy bears come coated in a natural oily residue that helps keep them from sticking together — but that oil could prevent silicone from curing properly. I am not sure this step is necessary but I did it to be safe.
- Wipe each gummy bear with a paper towel and rubbing alcohol.
- Let them dry completely.
- Heat up your hot glue gun.
- Glue each gummy bear to the bottom of your mold container.
Be sure to:
- Space them out evenly.
- Leave enough room between each bear so the silicone can form sturdy walls.
- Press them gently but firmly so they don’t float.
Pro tip: Hot glue holds well but also pops off easily later when removing the original bears.
Step 4: Pour the Silicone
Once your gummy bears are secured, it’s time for the fun part.
- Slowly pour the silicone mixture into the container.
- Start in one corner and let the silicone flow naturally over the bears — this helps reduce bubbles.
- Make sure you cover the gummy bears with a thick layer of silicone on top. This is important! A thin top layer can tear when unmolding. Trust me on this one, I lost quite a few molds because I didn’t pour enough silicone.
Pro tip: Don’t worry about air bubbles. I found that they just worked themselves out when the mold was curing.
Step 5: Let the Silicone Cure Overnight
Silicone needs time to fully cure. Let the mold sit:
- Undisturbed
- On a flat surface
- Overnight, or according to your silicone’s instructions
Do not move or poke it during curing.
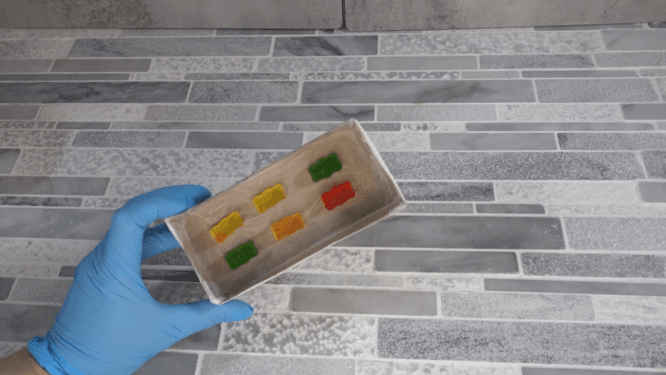
Once fully set:
- Peel away the cardboard container.
- Remove the Press’n Seal.
- Gently pull the gummy bears out of the silicone.
- Trim any thin or loose silicone edges with scissors.
Your custom gummy bear mold is now ready to use!
Step 6: Use the Mold — Make Melt & Pour Soap Gummies
Now let’s make the cutest little soaps. If you are new to soap making, here is a more detailed post on How to Make Melt and Pour soap.
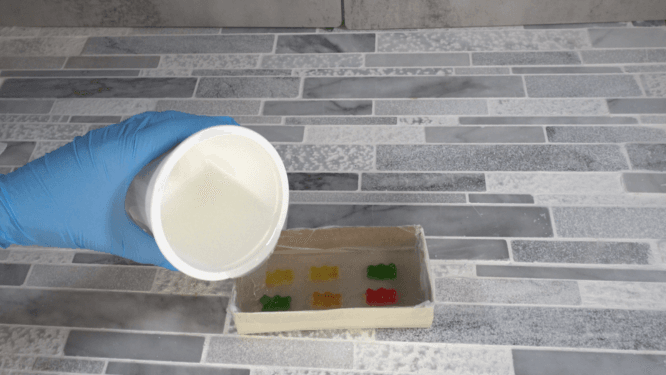
Melt the Soap
- Cut melt and pour soap into small, even pieces.
- Microwave in 10-second intervals, stirring often, until melted.
Color the Soap
- Add mica powder a little at a time.
- Stir until the color is fully blended.
- If the mica floats on top, spray with rubbing alcohol — it breaks the surface tension so the color blends in.
Pour and Unmold
- Pour the melted soap into each gummy bear cavity. (Be careful not to overfill it makes the bears look silly).
- Spray the mold with rubbing alcohol if you have any bubbles.
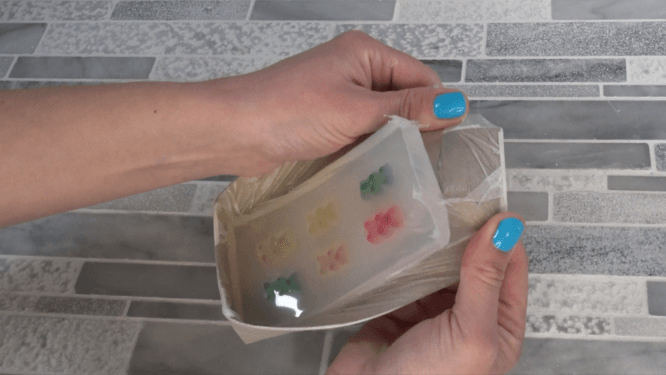
- Let the soap cool completely before unmolding.
- Pop out your little soap gummies and admire how cute they are!
Troubleshooting Guide (SEO Boost + Helpful!)
My silicone has bubbles:
Do not worry about this, the bubbles work themselves out when the silicone is drying. (At least it did in the silicone I used).
My mold walls / top are too thin:
Pour a thicker layer next time; thin sides / top can tear.
My melted soap won’t mix with the mica:
Spray rubbing alcohol, stir again, and add mica more slowly.
The gummy bears floated:
They weren’t glued down firmly — press them harder next time.
Safety Tips
- Always use silicone rated for mold making — not caulk or hardware-store sealant.
- Melt and pour soap can get hot, so be cautious when microwaving.
- Don’t use your silicone mold with food after using it with soap, resin, or wax.
- Wear rubber gloves to protect your hands.
Frequently Asked Questions
Can I use something other than gummy bears?
Yes! Silicone works great on small toys, buttons, flowers, charms, etc. You name it and you can probably make a mold from it.
How long does the silicone mold last?
With proper care, years.
Can I wash the mold?
Yes — warm water and mild soap. Avoid scrubbing or stretching it.
Can I use resin in this mold?
Yes, most 2-part silicones are resin-safe.
Final Thoughts
Making your own silicone mold is easier than most people think, and the results are so satisfying. Once you try this gummy bear mold, you’ll want to start molding everything! Whether you’re creating soap embeds, wax melts, or resin charms, this DIY mold will give you clean, adorable results every time.
If you make this project, tag me — I love seeing your creations!